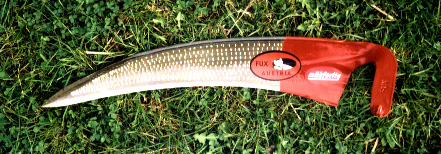
Austrian-Style Blade (Rasierschnitt): for grass and light weeds.

BLADES • SNATHS • PEENING EQUIPMENT
STONES AND HONING • BEGINNER'S SETS
SICKLES BUSH-KNIVES AND MATTOCKS • BOOKSAustrian scythe blades are recognized around the world as being of the highest quality. That is why, if you search around on the internet, you can find cheaper imitations endowed with an Alpine brand name. These could be made in Eastern Europe or China. Unlike many of these models, Schröckenfux blades come well-peened by the factory's technicians, and require only a short honing in order to mow satisfactorily. All the blades I sell now carry the same tang angle — so no fiddling around when you change blade.
I also sell what I consider to be the best currently available snath (handle) — made in Austria, from ash wood, it is very light, and will adjust to suit any person's stature. If ever I locate a better snath, I will stock that instead.
By scrolling down the page, or clicking on the menu above, you will find information about whetstones, peening equipment and other ancillary equipment. You may find it easier to buy one of the specially designed beginner's sets. If you are a complete beginner and don't know what you want, I suggest a Basic Set with a 60cm Austrian blade or else a ditch blade if it is thick weeds you are tackling — plus the Learn to Scythe book by Steve Tomlin.
BLADES
THE RANGE OF BLADES
I stock four basic patterns of blade. Do not agonize too much about which one to get. The difference between models 1, 2 andd 3 is not always crucial and is often just a matter of personal preference. The skill of the operator, the sharpness of the blade and the length of the blade all have more impact upon performance than the model of blade.
(1) Austrian grass blade : standard blade, for grass and light weeds. (Length: 60cm, 75cm and competition blade of 95 and 110 cm).
(2) Profisense: elegant, hook-nosed, grass blade; for meadows and lawns. This is sold in a full range of lengths (Length: 40cm, 50cm, 65cm , 70cm, 75cm, 85cm).
(3) Ditch Blade: hook-nosed blade for tough grass and weedy vegetation; ideal for hedgerows, fencelines, in between fruit bushes etc. (55 cm, 65cm). The most versatile blade.
(4) Bush Blade: for woody growth; thick as a light billhook; no good for grass. (40cm and 50cm).These blades are described in greater detail further down the page. All these blades, except the Bush Blade (4) are capable of cutting any kind of vegetation from grass up to coarse non-woody weeds, including dock, thistles, bracken, green bramble shoots, hogweed etc, but are designed to be particularly appropriate for certain conditions. I repeat: do not worry too much about which blade to buy — the most important factor is how well you learn to sharpen it and use it.
LENGTH
These different patterns of blade come in different lengths. Other things being equal, the shorter the blade the tougher it is, and the longer the blade the more skill it will require.
Tiny blades (40cm - 50cm) These are most likely to be useful for mowing ground cover around cultivated plants: for example undersown green manure to serve as a mulch, around daffodils, around closely planted fruit bushes etc. If everything is getting out of control and weeds threatening to outgrow cultivated plants, mowing with a short blade is usually a lot quicker than hoeing, and hoeing easier after you have mown,
Shorter blades (from 50cm to 60 cm) are for working in confined or constricted areas, or between plants that you wish to preserve. 50-55 cm is good for narrow paths, gardens and allotments; if you are not as fit as you were in your youth, will be better off with a short blade.
Medium blades (60-65 cm) are good for between closely planted trees, along fence lines, banks and ditches, for tough vegetation, and for bumpy ground. if you are a novice, or if you are not as fit as in your youth, will be better off with a short blade. If you are a complete novice, you will find mowing easier with a short or medium blade.
Long blades are for open ground. 70 or 75 cm is a good length for tackling open grassland. 85 cm - 95 cm is for skilled mowers.
Massive blades. Unless you are fit, strong and accomplished, I do not advise you to use the 110 cm blade for anything except competitions. On request I can supply anything up to 135cm.
It is common for people to keep two blades, one long and one short. Often the longer blade will be kept finely honed for grass-mowing, while the shorter blade is kept less finely profiled for rough weedy patches, and for lending to importunate friends.
VEGETATION GUIDE
Lawn: Profisense, unless very undulating in which case a Rasierschnitt.
Meadow grass (stangding upright, with or without wild flowers): Profisense, 65cm to 85cm; or 60cm to75cm Rasierschnitt.
Meadow grass (old, lodged, tangled or tussocky): 60cm Rasierschnitt, or 65cm ditch blade.
Stinging nettles: when young, any blade; when old a ditch blade.
Rushes (juncus): ditch blade 55cm or 65cm, or a 60cm Rasierschnitt.
Brambles: new shoots, any blade; two to four years old, ditch blade; ancient briar patch, see below under "Sickles and Bush Knives").
Bracken, old docks/docken: Ditch blade is best but 60cm Rasierschnitt will do the job.
Very tough mixed weeds: 55cm ditch blade
Thorn suckers, fruit tree suckers: 40cm bush blade, or else use a mattock.
Heather: bush blade, and only if young.
Waterweed: 60cm Rasierschnitt grass blade, but others will do.
Mixed weeds: ditch blade.
SWAPPING OVER BLADES
All blades come with the same tang angle, and so can be fitted to the same snath without fiddling about with wedges or shims. It takes about one minute to remove one blade and fit another.
BEGINNERS
If you want an easy all round blade to learn to mow grass with on, I suggest a 60cm Austrian grass blade. If you graduate to a longer blade, this one will still be useful for confined areas, bumpy land, tougher vegetation etc.
DETAILED DESCRIPTION OF BLADES
Austrian-Style Blade (Rasierschnitt): for grass and light weeds.
These are a standard pattern of general purpose grass blade used throughout Austria and neighbouring countries. Besides grass, they will also cut bracken, nettles, one-year old brambles, and most other annual growth before it has gone to seed. They are 50 millimetres wide and like all the blades I sell, are hand-forged. The tip is quite elevated and so the blade is good for bumpy ground, for banks, and for lending to volunteers and novices, but is not as good as the Profisense for lawns and fine mowing. The following blade lengths are normally in stock: 60cm, (60 cm pictured), 75cm, 95cm.
Profisense Blades: for grass, lawns, and light weeds
These are a model of grass blade developed in 2010 by the technicians at Schroeckenfux. They are light and have a hooked curve at their extremity, for the last six inches or so, a bit like a parrot's bill though not as exaggerated. In open field mowing this helps distribute the burden of the work more evenly along the whole length of the blade, whereas a blade with an even curve invites a disproportionate amount of the cutting at the front end. The hook-nose also makes it easier to work along fence lines without snagging the blades. The tip does not curve upwards as much as on other models: this facilitates the even cut necessary for lawns. It is the style of blade recommended by Peter Vido, and he and his family are using a similar form blade (but not exactly the same model) in this video: http://www.scytheconnection.com/adp/video/index.html.Besides grass, they will also cut bracken, nettles, young brambles, and most other annual growth before it has gone to seed. The following blade lengths are normally in stock: 40cm, 50cm, 65cm, 75cm and 85cm, all pictured above in their cellophane wrapping.
Ditch Blade: for weed clearance.
These are designed for mowing tough grass and weeds on ditches, banks, in gardens, around fruit bushes etc, but are also effective on light grass. They are an Italian model, originally designed for mowing around vines. They are more robust than the Grass Blades, but not as tough as the Bush blade. Ditch Blades have a reinforced tip to protect it from stones and other hard objects. They have a hooked curve at the extremity, where the blade is also quite narrow, but are quite wide at the near end (making them stronger, and more effective at shifting the cut weeds out of the way). The hooked nose makes it easier to avoid snagging the blade on fences when working a fenceline. The blade is quite flat, and it is quite possible to mow a lawn with a Ditch Blade, providing you have sharpened it enough. I currently stock these blades at 65cm and 55cm (pictured above). The 55cm blade is tougher, more nimble in awkward places, and better for people who are not as fit as they used to be; the 65cm blade will fell weeds faster on open ground.
Bush blade: horny weeds and woody stems.
This blade is much more robust than those listed above. It is a thick, heavy duty blade, 60mm wide, and about the same gauge tool as a light billhook. It is capable of cutting most woody plants up to half an inch in diameter, or bigger, depending on the species; but it is not recommended for grass. Typically used to work in areas where there are small saplings, fruit tree or thorn suckers, or weeds with woody stems. Care must be taken to keep the blade sharp, since heavy use of a blunt blade on tough material could damage the snath, or bend the blade at the tang. I now stock both 50cm and 40cm bush blades The longer blade is better if you are taking a mixture of vegetation, including some tough stems; the shorter blade is better for targeted removal of tough woody stems one at a time, and is less likely to be damaged through over-enthusiasm.
Competition blades
I often have a small consignment of competition blades, the same form as the Standard Austrian blade, 110cm long. I can order them in any length up to 135cm.
Left-handed blades
I can get hold of left-handed blades (only one size and model, 70 cm Standard Austrian) and left handed snaths, and sometimes have them in stock. SINCE THE LOCKDOWN, THEY ARE NOT CURRENTLY AVAILABLE. Left handed blades are not traditional, because a left handed scythesman cannot mow in a team, unless all the mowers are left handed. Because the movement of mowing is symmetrical, most left-handers have no problem adapting to a right handed scythe. The only good reason I can think of for buying a left-handed scythe is that you have a good excuse for not lending it.
Blade Covers
I stock blade covers, made of tough canvas by Sally Davis, in a shade of green that is unlikely to get lost in the grass. I currently have 3 sizes, 55-60cm, 65cm and 75cm. (A cheaper option is to cut the leg off an old pair of jeans. Or else use the spongy tubular pipe lagging which comes with a longitudinal slit.)
ETYMOLOGICAL NOTE The word snath can be spelt about as many ways as the name Shakespeare: snaith, snathe and snead are the most common variants. The Oxford English Dictionary gives ten different spellings which it says are "irregular and difficult to account for". The word comes from the word snead or sned , meaning a lopped pole or branch from a tree, and a snedding axe is still the term for the tool used for limbing felled trees. It is related to the German schneiden, to cut. The US pronunciation (which is what I use) rhymes with US pronunciation of the word "bath" or the English word "hath". In the UK, as well as the US pronounciation, I have heard snathe (to rhyme with bathe), snaith (to rhyme with bathos), sned (to rhyme with bed), sneed (to rhyme with bead), and snuth (to rhyme with the Northern bath), but never snarth (to rhyme with the upper-class bath).
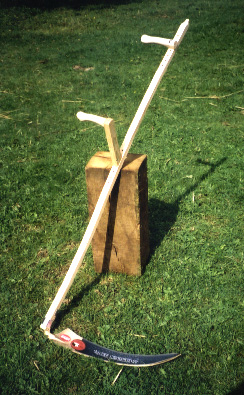
The Adjustable Wooden Snath
Finding a good snath used to be more difficult than finding a good blade. Your stature, your style of mowing, the blade you use, the topography of your land, and the kind of vegetation you are cutting all influence the shape of the snath that is right for you. If the snath isn't right for you, or isn't set up right, then you will tire quicker, or experience muscle pains.
The main challenge for a snath designer is to get the right hand grip and the left hand grip swinging at approximately the same level, even though they are attached to a shaft which is held on an incline. This can be achieved either by making an S curve in the wood (as in the traditional Anglo American snath); or by sticking the right hand grip on a spur projecting from a straight shaft; or by a combination of the two (as in the Adjustable Wooden Snath).
Adjustable wooden snaths are designed by Peter Vido and technicians at Schroeckenfux. They have a lightly curved ash shaft (the curve deviates 2 inches from a straight line). Both the right and left hand grips can move along the shaft. The method of fixing the grips to the snath, which involves a single bolt, is ingenious, secure and not at all cumbersome. The snaths are light, quite slim at the top, but with sufficient meat at the bottom to trim the end to adjust the angle of a blade if necessary. The blades I sell are all compatible with the wooden snaths I sell.
The adjustable snaths are now supplied in four sizes of shaft, . Here is what I estimate the ranges of sizes are, bearing in mind that there is considerable variation in people's preferred stance, and in the length of their limbs. Most people will take a size 2 or size 3.
Kid's snath. For people up to approximately 4 foot 10 inches The kid's snath is currently sold with both full-sized and short right handgrips.
Size 2 Short snath. For people from 4 foot 10 in up to 5ft 9 in.
Size 3 Long snath. Ideally for people from 5ft 9 in up to about 6 ft 2 in. It can also be set for people of between 5 ft 6 and 5ft 9 in but a size 2 will be more nimble.
Size 4 Long snath. For people over 6 ft 2 in .
Children — Some children even as young as six take to mowing. For children of around 10 years I recommend a 50cm grass blade to begin with, younger than that a 40cm grass blade.
Couples.When a tall person and a short person want to use the same snath, a size 3 will most likely be the best solution.
All the above is rather complicated. Please phone or e-mail for further advice, or else stipulate the height of potential users and I will sort out the correct combination for you.
Snaths should be treated from time to time with raw linseed oil.
An adjustable wooden snath, with a 60 cm Austrian style blade (left) and with a 75 cm Oriental blade (right).
Why I No Longer Stock Other Snaths
I do not stock cheaper metal snaths for a number of reasons (i) because they are ergonomically poorly designed, especially for tall people; (ii) because it is hard to adjust the angle of a blade on a metal snath and (iii) because the handgrips are turned cylinders of wood rather than shaped and angled to fit the human body.
I am aware that the adjustable snaths are expensive. The aluminum snaths are light, and they are often preferred for underwater scythe work. If you want a cheaper or a metal snath try Simon Drummond at http://www.get-digging.co.uk/. (His site also sells a large range of Spanish mattocks).
D Ring and Grub Screws
The blade is attached to the snath with a clamp, or D ring, held in place by two grub screws, driven by an Allen key. Both D ring and Allen key are provided with every snath, or can be bought separately. The design of this has been improved several times over the last few years and it is now pretty secure. The grubs screws should be tightened very securely.
The D ring has recently been redesigned. Ther have been some teething problems with the new rings which are sometimes a bit tight and hard to remove. If you have trouble removing one, remove the grub screws, place it on a solid wooden surface and tapit smartly a few times with a hammer, as in the photo below.

I am getting mighty sick of people sending in for spare grub screws, sometimes as many as eight. To lose one may be regarded as a misfortune, but to lose a second one is reprehensible. If you fail to tighten up the grub screws sufficiently then the blade will slip back to a wide hafting angle and place undue stress on the tool, with the risk of damage to the blade and the snath (this is explained in detail in the instruction book that accompanies each scythe).
The cost of making out a VAT receipt for a grub screw and of packing it is more than the grub screw is worth. I therefore send a single one out free of charge to people who send in an sae for a large letter, But if you want more than one, I charge £5 for three.
Spare Parts for Snaths
If you need to replace your snath shaft or the handgrips, I sell all these parts individually. See the price list. The design has changed over time, so please let me know when you bought the original snath.
BASIC ADVICE
• If you plan to mow grass on any scale you need to understand what peening does (see the guide to the Austrian scythe) and consider acquiring peening equipment.
• If you only want a scythe for occasional weed control, then you may be able to do a satisfactory job without peening, but the ability to peen will improve performance.
What Is Peening?
More than half the skill in scything is learning how to keep it sharp. However repeated honing brings the edge back into thicker and thicker metal, and makes the bevel at the edge bull-nosed. If you aim to cut grass in any quantity you will need periodically to peen or cold-forge your blade. This involves tapping out the edge of the scythe to get rid of the bull-nose and make it thinner. Peening takes about 15 minutes.
Peening is also used to reshape the edge of the blade after filing out the cracks or chips that can occur if blade meets a stone, tree stump or other obstacle.
Peening with hammer and anvil requires some skill, and unless you have experience at working metal you will benefit from tuition. Peening instruction is a considerable part of my courses for beginners. Courses There is more information on how to peen the blade in the section on "peening" in the guide to the Austrian scythe; in The Scythe Book; in the instruction book I supply with every scythe; at http://www.scytheconnection.com/adp/docs/peening.html; in illustrations on www.scythesupply.com ; and on youtube at http://www.youtube.com/user/ndudman8 and http://www.youtube.com/user/Scythesman8
For example, for the jig see http://www.youtube.com/watch?v=fEqAmrc4H3k .
For the table anvil see http://www.youtube.com/watch?v=ZmtQVBKgUjE and http://www.youtube.com/watch?v=_q67k2KJ4Ns
For the ordinary bar peen anvil see http://www.youtube.com/watch?v=6JbSqcl-EAk
If you search around you will find others. Many thanks to Neil Dudman and Botan Anderson for these very useful guides.If you only want a scythe for occasional weed control, then you will be able to do a satisfactory job without peening. However you will need to file the blade down to a thinner bevel every so often. A chainsaw file can be used for this job, but you have to be careful not to rip into the edge of the blade (and not to cut your fingers). An alternative is a Tormek grinding wheel, or similar, providing it is running through a water bath, but I reckon a file is better.
I stock four kinds of peening equipment, but advise that beginners get either the peening jig, bar peen anvil or the table anvil. These can all be bought as part of the scythe sets, described further down the page. The hammer and flat anvil system is trickier, but some people like it and it is useful for repairing chipped or cracked blades.
If after considering the options and watching videos on youtube you are still uncertain, you might find it best to buy the Basic Set, which comes without peening equipment, and undertake peening later when you have familiarized yourself with the tool, and found some tuition or guidance.
Bar Peen Anvil
I stock Picard bar peen Anvils from Germany (above right) and also sometimes have cheaper ones from Eastern Europe. This system involves placing the edge of the blade upside down on the anvil, and tapping it with an ordinary carpenter's hammer, of 16 to 20 oz, with a well polished head. Most people find this an easier method than the flat anvil system described below, because it is easier to determine exactly where you are hitting. However it is still not easy. I don't advise beginners to start with this system unless they are fully confident of their ability with hand tools generally, or else have someone to teach them.
See http://www.youtube.com/watch?v=6JbSqcl-EAk
Fux Table Anvil
This is a bar peen anvil recently developed by the peening geeks in Schröckenfux's research department. Don't be influenced by the poor quality photo, this is the Rolls Royce of peening anvils, made of very high quality steel. It comes with two removable guides: a table which helps position the blade vertically, and a side plate which helps position it laterally. This is the anvil I prefer to use myself, though I don't bother with the table and back plate. It is the easiest of the freehand peening methods to use, but it is still difficult for novices, so again: I don't advise beginners to start with this system unless they are fully confident of their ability with hand tools generally, or else have someone to teach them. The only drawback is that it is expensive. I recommend this anvil for groups and organizations, especially if the anvil might be used by people of differing levels of competence; or for people who want the best and for whom price is not an issue.
see http://www.youtube.com/watch?v=ZmtQVBKgUjE and http://www.youtube.com/watch?v=_q67k2KJ4Ns
Peening Jig
The jig is an alternative to the hammer and anvil which ensures that you hammer out the blade to a prescribed thickness. It requires less skill than freehand peening, and so a novice is much less likely to damage their blade — but on its own the jig will not normally achieve as good a result as accomplished freehand peening. The jig is also not as effective as a hammer and anvil for repairing cracks and nicks in the blade. On the other hand it works well on the tight curve of a sickle.
The jig consists of a cylindrical polished metal drum, about the size of a small pot of face cream, with a spike coming out from the underneath to fix it in wood, and a machined metal column projecting upwards from the centre of the top circular surface. The blade is held the normal way up flat on the anvil with its edge touching the base of the column. A hollow cylindrical cap is placed over the column. This is accurately machined so that when tapped with a carpenter's hammer, it will compress the edge of the blade in the correct place. The blade is moved along, a millimetre at a time, as you tap. A second cap will compress the extreme edge of the blade even finer.
There is a lot to be said for peening initially with the jig, to get the basic profile right in safety, and then finishing off with hammer and anvil to get a keen finish.
I now sell a jig from the Czech republic, which is part of my "Economy Jig Set". The quality of the steel of this model is not brilliant, but it is less than half the price of the superior Fux model.
see http://www.youtube.com/watch?v=fEqAmrc4H3k
Fux Peening Jig
This more expensive jig is made of much better steel than the Eastern European jigs, and the profile of the caps is in my view better designed and makes it easier to achieve a really fine edge. . It is part of my "Better Jig Set" and comes with an instruction leaflet in English.
Flat Anvil
An alternative peening system comprises a cross-peen hammer and a small flat anvil (pictured above), with a face about two inches square (though in fact it is slightly convex). The blade is held flat on the anvil, normal way up, and the edge gently tapped with the narrow head of the hammer. It requires skill, concentration and practice. This is the trickiest way to peen — but somer people prefer it and it is the best set up for hammering out chips and small cracks. The flat anvil illustrated above is from Picard. The surface is slightly convex, but some people prefer to grind it dead flat on a grinder. You can make a serviceable flat anvil by grinding and polishing the top of a splitting wedge, or the back an old axe head, or the head of a splitting maul.
Peening Hammer
An ordinary 16oz hammer carpenters' hammer, such as the one pictured above will do for peening on a bar peen anvil, provided the head is slightly convex and polished to a shine. Estwing 16oz hammers are particularly good for peening, and when new have a nicely shaped and polished surface. I like them for edge peening as their small head improves accuracy. I don't sell them at the moment but they are available in good hardware stores for around £35.
I do sell The Picard peening hammer, made in Germany, which has a square flat head (slightly convex) for use with the bar peen anvil; and a well-shaped bar peen head for use with the flat anvil. It comes very well polished and is made of high quality steel.
HONING EQUIPMENT
Whetstones
I supply several kinds of stone. All of them come in the "boat" shape (as opposed to the "cigar" shape, customarily used on English scythes). The rounded edge of the stone is used , rather than the flat face, and the boat shape is necessary to get into the cross-sectional curve of the blade at a sufficiently fine angle. Four of them are depicted below with the coarsest on the left and the finest on the right: coarse, Silicar, Bregenzer and Rozsutec. The Mailander and Le Saurat are not pictured.
To mow grass competently you need at least two of these: a coarse artificial stone for occasional use, when larger amounts of metal need to be removed; and a fine natural stone for regular touching up in the field. To keep the price down in the cautious set I supply two stones, the coarse synthetic stone, for profiling and repairs, and a natural stone for regular touching up — but the committed scythesman will find three, or even all four, useful (especially if you drop one of them on the floor and break it). I now sell all five as a set at a reduced price.
For information on honing, see The Scythe Book or: http://www.scytheconnection.com/adp/docs/sharpening.html; or http://www.scytheconnection.com/adp/docs/peening.html ; or the videos at http://www.youtube.com/user/Scythesman8 and http://www.youtube.com/user/ndudman8
• Synthetic coarse whetstone, silicon carbide, 23-24 cm long. This is mainly used for profiling the edge, repairing nicks and cracks, and after using the peening jig);. It will get the blade moderately sharp, with a rough slightly serrated edge, good enough for topping weeds — but if you use this blade for regular honing you will eat through your steel quickly. These are cheap, but wear away quickly.
• Synthetic medium whetstone "Silicar", silicon carbide, 220 grit. A high quality intermediate stone, longer than the others. It is less aggressive than the coarse stone and lasts a lot longer. It can be used: (a) as an intermediary stone between the coarse and a fine natural stone, eg after a repair, or peening with the jig; (b) directly after freehand peening with the anvil prior to using a natural stone; (c) for refreshing a tired blade at the end of the day when really it needs peening. Also, if you insist on a "one size fits all" whetstone, this is probably the best choice.
• Natural fine grit Bregenzer sandstone; unfortunately these stones are no onger obtainable.
• Mailander, blue, fine grit sandstone. Somewhat similar to the Bregenzer, heavier, better finish, less likely to break, and more expensive. SOON TO BE DISCONTINUED AS THE QUARRY HAS CLOSEDV DOWN
• Le Saurat A stone from the French Pyrennees. It is about the same grit as the Mailander, but with a softer matrix. This means that it wears away quicker than a harder stone, but the exposed grit tends to be fresher and less worn.
• Natural extra fine grit Rozsutec sandstone, finer than 600 grit; this is the stone to use to get a well-peened blade as keen as you can. It will also get a good edge on a pocket knife.
If you break these stones in two, they can be glued back together with epoxy resin, after very thorough drying in an oven. The Silicar and Rozsutec make a good pair for sharpening knives and chisels.
Files
If you want to avoid peening, then an Oregon flat chainsaw file (made by the Swiss firm Vallorbe), 6 inches long by 0.5 inches wide, is the best tool for filing down the shoulder to regain a fine bevel. The motion of the file should be towards the edge of the blade; if the direction of filing is away from the edge of the blade then the upturned rib of the blade gets in the way and makes the angle of filing too high. This means your knouckles are vulnerable if the file slips so WEAR GLOVES. Touching up with the file in the field will also partially revive a tired edge which is in need of peening. The file is also used for filing out cracks, dents, tears and bumps that may appear in the blade. These files will go blunt over time; they can be bought at any decent hardware store.
Stone sheaths
Metal Sheaths
I normally stock copper and galvanized sharpening stone sheaths, as pictured above.. These attach to the belt and hold water, allowing you to move around with your whetstone in easy reach. Since it is desirable to give your blade a few passes with the stone every five minutes or so, these are more useful than one might think.
Cow horn sheaths
These are polished black and white cow horns which attach to the belt and hold water, pictured above. Imported from Europe. Very classy, some might say posey. I find them handy because you can take them off and stick them point first in the ground if you need to share a stone.
Garryflex rubberized sanding blocks
These hand-sized rubber blocks, impregnated with sanding grit (medium, 120 grit (grey), medium coarse 60 grit (blue), coarse 36 grit (claret) are much the best tool for cleaning rust and gunge off your scythe blade, prior to peening and honing. 120 is best for the edge, 60 for polishing up a whole blade, 36 for a blade that has become peppered with rust over winter). They last for ages, and are useful for many other tasks.
x 10 Magnifying Lens
These little eye-pieces will open up the wonderful world of friction to you, so you can view enemies like burr, cracks and rust in all their ghastliness. They are handy for understanding what is going on when you are learning how to peen, profile and sharpen a blade. Also good for examining the true nature of things like tiny flowers, beetles and skin.
SETS
The Basic Beginner's Kit (without peening equipment)
This comprises • One Adjustable wooden snath with clamp • One blade (any kind 65 cm or under) • One Saurat sharpening stone (medium fine) • One synthetic sharpening stone (coarse) • One flat file • One copy of Notes on the Use of the Austrian Scythe.
Buy this set:
(1) if you just want a scythe for occasional use knocking down weeds. You can get by without peening equipment by doctoring the blade with a file every so often.
(2) if you are a complete beginner and don't know what you want or whether you want to tackle peening. It will get you started and you can graduate to peening or a longer blade later.
SETS WITH PEENING EQUIPMENT
Grass is harder to mow than weeds and your blade needs to be sharper. If you want to mow grass competently and on any scale, then you will sooner or later need to peen your blade. With this in mind, I supply four sets, two with a peening jig, and two with freehand peening anvils. Scroll up to the peening section to see photos of these tools.
The Economy Set (with E European peening jig)
This set is cheaper, and contains a peening jig, which is easier to learn to use, though it still helps to have someone who can show you how. It includes:
• One Adjustable wooden snath with clamp • One blade (any kind except the competition blade) • One E European peening jig • One Saurat sharpening stone (medium fine) • One synthetic sharpening stone (coarse) • One steel stone sheath • One flat file • One copy of Notes on the Use of the Austrian Scythe. A hammer is not provided because an ordinary 16oz carpenter's hammer will be fine.The Better Jig Set (with Austrian peening jig)
This set is the same as the Economy except it includes the considerably higher quality Austrian peening jig.
The Freehand Set (with bar peen anvil)
Instead of the peening jig,this set includes a bar peen anvil, which can produces a better result, but is trickier to learn (so it can also produce a worse reult,. See above under "Peening". I do not advise starting with this set unless you have either (a) considerable experience and facility with using hand tools generally, or (b) some experience at metal work, or (c) someone to show you how to use the anvil and (d) have looked at the video at http://www.youtube.com/watch?v=6JbSqcl-EAk
It includes:
• One Adjustable wooden snath with clamp • One blade (any kind except the competition blade) • One bar peen anvil (German) • One Rozsutec sharpening stone (extra fine) • One Silicar synthetic sharpening stone (medium) • One synthetic sharpening stone ( coarse) • One galvanized steel stone sheath • One flat file • One 120 grit sanding block • One copy of Notes on the Use of the Austrian Scythe.
Remember this set does not include a hammer. You can use an ordinary 16oz carpenters' hammer, but the head must be very well polished and slightly convex. Otherwise I sell Picard European peening hammers .
The Superior Peening Set (with table anvil)
This is the same as the set above, except that it has the superior Table Anvil, instead of the perfectly adequate but trickier Bar Peen anvil. See above under "Peening". The table anvil is easier to use than the freehand anvil, but once again I do not advise starting with this set unless you have either (a) considerable experience and facility with using hand tools generally, or (b) some experience at metal work, or (c) someone to show you how to use the anvil and (d) have looked at the videos at http://www.youtube.com/watch?v=ZmtQVBKgUjE and http://www.youtube.com/watch?v=_q67k2KJ4Ns.
Remember this set does not include a hammer. You can use an ordinary 16oz carpenters' hammer, but the head must be well polished and slightly convex. Otherwise I sell Picard European hammers.
PYO
All the sets are designed for convenience of decision-making at your end, and of packing at my end; and they work out a bit cheaper than buying the goods singly. But the discerning customer may prefer to pick and choose items individually from the price list. Someone who is competent but short of cash may get by with a couple of stones, an old but polished hammer head for an anvil, and a beer can for a stone sheath. Well-off newcomers to the mysteries of manual work might wish to purchase both a peening jig and a bar peen anvil, to compare them, use both, or graduate from one to the other.
Sickle
A very neat, lightweight hook, made from quality Schroeckenfux steel. Weight 255 grams. Length along the back 53 cm; internal diameter from tip to beard 23 cm. This sickle has shallow-angled bevels on each side which can be maintained with a file. The edge can be peened, though the heavy curve means that this must be done with care. The peening jig is probably the easiest tool for peening it. I also sell a left-handed version of this tool.
Che's Mate (anag)
These lightweight bush knives can be peened to whatever edge you require. Their blade is 16 inches (40 cm) long and the tool weighs just under a pound (420g). Brings out the Errol Flynn in you. Latinos can mow lawns, peel oranges, and slice wasps in mid air with them. More reach and more swing than a billhook, but no hook to gather up cuttings. The wooden handgrip could be better, but nonetheless this is my preferred tool for bramble bushes.
Magna Grecia Mattock
By popular demand (mostly generated by Peter Vido) I have been stocking Magna Grecia two-pronged hoes. These mattocks are the best tool for penetrating flinty and stony soil, the fastest way to break up weedy ground by hand, and my choice for lifting potatoes. For more information see http://scytheconnection.com/magna-grecia-hoe/ I only sell the head. The most convenient handle to buy is a paviour's maul handle, which has a rectangular end section large enough to be fitted into the mattock's rectangular hole, such as the one advertised here:
These are now out of stock. They are a terrific tool, but a bit difficult for me to acquire from Falci in Italy. I have tried to persuade http://www.get-digging.co.uk/ to stock them, but so far without success.
Other Tools, Other Strategies, Other Websites
Eradication instead of Decapitation. If, instead of topping, you want to uproot weeds such as dock, marsh thistle, or ragwort then I recommend the Lazy Dog, which is a modern ergonomic version of the old two-fanged dock-puller, but with a variety of attachments for different species. It is designed and sold by Philip Trevelyan from his website http://lazydogtools.co.uk/
Brambles. There are many ways of dealing with briar patches. A bush blade, or even a ditch blade, will cut bramble stems near the base, but the trouble is that the creepers are still tangled up together at the top so you have to sever them there as well. My preferred method is to use a machete to cut the main growth, then go over with a mattock, to chop the stems and stubs off flush with the ground. This means that you can then mow the regrowth with a grass scythe, without it getting snagged on the old stems. Mattocks are available at http://www.get-digging.co.uk/ )
INSTRUCTION AND BOOKS
Instruction Manual
All complete scythes are sold with a 28 page A4 information pack called Notes on the Use of the Austrian Scythe. I give advice over the telephone, and if you are having problems will do what I can to help you overcome them. If you come to the store to buy a scythe, I can spend a few minutes explaining how to set the scythe up, use it and maintain it, but no longer have time for individual tuition. If you are a novice you are strongly advised to buy Steve Tomlin's Learn to Scythe book (see below), and if at all possible attend a course.
Learn to Scythe
The comprehensive instruction manual by Steve Tomlin for anyone learning to use a scythe. The detailed step-by-step approach is ideal for beginners who cannot locate a convenient scythe course, and a useful aide-memoire for anyone who has completed a course. 80 pages, with very clear full colour photographs and diagrams. For more infromation see https://stevetomlincrafts.wordpress.com/scythes/
The book costs £10, but it is reduced to £7 for anyone buying a snath and blade.
Managing Grass In Britain with a Scythe
This 64 page booklet by Simon Fairlie provides a broad explanation of how temperate grassland ecosystems flourish and explains what special approaches you need to take towards grassland management when your main tool is a scythe. The chapter headings are as follows: Three Important Characteristics of Grass; Origins of the Schizoid Approach to Grass Management; Wildflower Meadows: How to Reduce Fertility; How to Deal woth Unwanted Grass; The Scythe in Small-Scale Productive Farming; Balancing Meadow and Pasture; Progressive Haymaking; Haymaking Techniques; Moving and Storing Loose Hay; Mowing Difficult Meadows; Weeds; and Lawns. It contains 48 very fine colour and black and white illustrations.
The Scythe Book

I am once again selling The Scythe Book , by David Tresemer with a 70 page addendum by the late Peter Vido, which has recently been republished. It has a new cover and layout, but I haven't got round to taking a photo yet.
Vido's material has now been published on line as The Big Book of the Scythe available here http://scytheconnected.blogspot.com/2018/05/the-big-book-of-scythe.html
OTHER MAKES OF SCYTHE
If you are looking for an English scythe, I only very occasionally have secondhand items in stock, or can advise you where to buy one. I can also direct you to suppliers who sell cheap scythes with metal snaths whose quality reflects the price. Falci blades (Italian) are beautifully peened and finished but a bit fragile in my view. Gunas scythes (Turkish) are apparently quite good, but I have yet to see one in the UK. Russian and Polish blades are pretty rough. Vintage blades labelled "Turk Scythe" or "Sense Union", were made in Austria or Germany and sold in the UK towards the end of the 20th century; they are good quality and will fit on my snaths. Freund scythes are made by Offner, another Austrian firm; the blades are OK, I think, but their snaths are not good for anything other than light work. Do not buy a Chinese scythe or one from from Amazon, as these can be dreadful and almost impossible to get sharp.The image below is of an aluminium snath and blade also made by Schroeckenfux, and distributed by Rutland in the UK for £149.95. The snath is an early prototype of the wooden snaths which we now sell, and as such is not as comfortable or adaptable (the position and shape of the handgrips are far from ideal).
Note that in this publicity photo, the arm holding the right hand grip has been fixed onto the snath upside down, creating a massive span between the two handgrips, more suitable for an orang utan than a human. The moral is: don't buy from suppliers who haven't a clue about what they are selling.